Colorful Floral Field

Hello everyone! Today, I’m back with another colorful floral card.

I used a woodblock stamp from Stampendous called “Flower Fields.” I recently snagged this awesome stamp and some other stamps from Michael’s clearance section.

ColorfulFlowerfield_FE


I stamped the image 3 times on A2 size Neenah Solar White 80lb. cardstock with Memento Tuxedo Black ink. I also stamped the sentiment and couple of butterflies, both from Avery Elle’s “Woodland Wonders.”

I colored all the images and added light blue shadow around the images with Copic markers. I darkened the shadow a bit with Prismacolor Color pencils. I also drew in the grass on the bottom of the panel with Copic markers. I added some shite dots with white gel pen.

I cut the panel down to 4″x5.25″, rounded all 4 corners with corner chomper, added black fun foam on the back, and adhered it on the A2 size black cardbase. I used Scor-tape for the strong hold. I added natural color thread on the top of the card and finished the card by adding some Clear sequins from Pretty Pink Posh.


ColorfulFlowerfield_CE


Hope you enjoyed this card and thank you for visiting!

Don’t forget to subscribe for future posting notifications! ^.~*

Happy crafting!! 

Hello Beautiful! (Colorful Floral Frame)

Hello Everyone! Hope you are having a fabulous Monday! I’m back with a floral frame card today.

I used Avery Elle’s stamp set called “Floral Frame.” I bought this set on the release day, but didn’t get a chance to play with it until now. It includes a bold floral image clustered like a corner frame, and it’s very fun to color. I hope you’d enjoy this fun and colorful card.


ColorfulFlowerFrame_April_FE


I stamped the floral frame image on the top left corner of a A2 size Bristol cardstock with Versafine Black Onyx ink, using mini Misti tool. I flipped the cardstock around to stamp the same image on the bottom right corner. I also stamped the sentiment on the center of the panel with the same ink. The sentiment is from Simon Says Stamp’s “Hello Beautiful.”

I waited until the ink was completely dry, and I colored the image with Zig Clean Color Real Brush Markers. I apologize I used so many markers on this card, I couldn’t keep track of the colors I used. I picked the bright colors as possible. I didn’t use any water, but used lighter colored Zig markers to blend out the darker pigments from the center of the image. I also colored in shadows around the image and the sentiment with the gray Zig markers.

When the panel was completely dry, I darkened the shadows and added some details on the image with Polychromos color pencils.I also drew in white dots all over the image with white gel pen and added some shimmer with Clear Spectrum Noir Sparkle pen. I also added details around the sentiment with white gel pen. I cut the panel down to 4″x5.25″, added a black fun foam on the back, and adhered it on the A2 size black cardstock. I used Scor-tape for the strong hold. I finished the card by adding some clear droplets from Pretty Pink Posh and natural color thread on the top of the card.


ColorfulFloralFrame_April_CE

Hope you enjoyed this card and thank you for visiting!

Don’t forget to subscribe for future posting notifications. ^.~*

Happy Crafting!!! 

Sympathy card (Ranunculus)

Hello everyone!

I would like to share a sympathy card I made for a dear friend of mine. I find that sympathy cards are toughest to create, and this card was not an exception. I sat in front of my craft table, thought and thought and thought about which stamp set, colors, and sentiment to go with. I could not make up my mind for a while, but I set my mind on the beautiful Ranunculus image from WPLUS9. I hope this card safely delivers my big hugs for my friend.

Here is the card I created:

PupleRanuculus_April_FE


I stamped the Ranunculus image on A2 size Bristol paper with Versamark and heat embossed with Wow Super Fine Gold embossing powder.

I colored the image with Zig Clean Color Real Brush pens and blended with water brush. The colors I used are: Violet, Purple, Deep Green, Light Green.

I let it dry completely, trimmed it down to 4″x5.25″, layered with a glitter gold cardstock slightly bigger than the watercolor panel with Foam tape, and adhered it on the A2 size black cardbase with Scor-tape.

I punched out few gold butterflies using Martha Stewart butterfly punch and adhered them on the card with Multi Medium Matte adhesive. I finished the card by adding some gold sequins from Pretty Pink Posh. The sentiment is from MSE “Sympathy” stamp set.


Purple_Ranuculus_April_CE1


Thank you for visiting and please don’t forget to subscribe for future post notifications. 

Have a blessed day! 

Purple Peonies (You are Incredible)

Hello Everyone!

Hope you are having a great Monday! I am back with purple peonies today! The stamp set is from The Ton’s new release, and it’s called “Happiest of Peonies.” Although I did not get to play too much with it, I really love this set! It’s very easy to achieve a stunning look with very little effort with this image!


Here is the card I made:

Ton_PurplePeony_FE


I stamped the image with Versamark on A2 size Arches 140lb. cold press water color paper and heat embossed with Wow Silver Pearl embossing powder.

I watercolored with Zig Clean Color Real Brush pens and blended with Spectrum Noir Clear Sparkle brush pen. The Zig pen colors I used are: Deep Violet, Purple, Yellow, Deep Green, and Light Green. I let it dry completely, trimmed the panel down to 4″x5.25″ and adhered it on black A2 size cardbase. I used Scor-tape for the strong hold.

I stamped the sentiment (from Altenew’s “Persian Motifs“) on a black cardstock with Versamark ink and heat embossed with Wow Super fine white embossing powder. I trimmed it down to a banner strip and adhered on the card with the foam tape.

I drew in some dots around the image with purple and silver gel pens and embellished them with Glossy accents. I finished the card by adding some Clear Droplets from Pretty Pink Posh.

Ton_purplepeony_CE


Hope you enjoyed the card!  

Thank you so much for visiting and don’t forget to subscribe for future posting notifications! 

Have a blessed week! ❤ 


Gold & Black (Hello Friend)

Hello Everyone! Hope you are having a great day!

I’ve been sick with cold since last Friday. 😦  Thankfully it’s not too bad, and I am still able to function and do things around the house. 🙂

Today, I would like to share a black & gold card I created. I used a stamp set called Feather More by Waffle Flower. I wanted this set so much ever since I saw someone foiled the feathers and made a beautiful card with them! Well, I was able to snag it with an awesome price, but unfortunately I do not own a foiling machine! 😦 So I decided to heat emboss them in different golds instead of foiling. I am quite happy how it turned out and I know exactly who to send it to! 🙂  I think there is nothing like handmade cards to tell your friends that you care! 🙂


Sorry for the long intro and here is what I created:

Feather_April_FE1


The feathers are all stamped with Versamark ink and heat embossed in 3 different gold embossing powders. From left to right, the gold powders I used on the feather images are: SSS Ultra Fine Rose Gold, Wow Super Fine Gold Rich, and SSS Ultra Fine Antique Gold. After heat embossing the images, I fussy cut them.

For the background, I stamped the double circle image from Concord & 9th’s Love you. Mean It. stamp set on a black 4″x5.25″ cardstock, and heat embossed in Antique Gold embossing powder. I heat embossed the edge with the same powder. I also drew in slanted lines across the bottom of the panel with gold gel pen using T-ruler. I adhered the panel on the 3mm black fun foam and secured it on the card base (Neenah Desert Storm card stock).

I arranged and secured the 3 feathers with tiny glue dots, tied the ends with gold embroidery thread, and adhered it on the card with Scor-tape. I made the sentiment with Dymo label maker and adhered it on top of the feathers with foam tape.I finished the card by adding some gold sequins from Pretty Pink Posh.

Feather_April_CE1


I hope you enjoyed the card and thank you so much for visiting!  Don’t forget to subscribe for future posing notifications! 

Have a blessed day and happy crafting!!! ❤ 

Way Too Sweet!!

Hello Everyone! Hope you are having a great start of the week! 🙂

I would like to share a card I made with Altenew’s “Way Too Sweet” stamp set. I let my daughter play with my stamp set and color the images, and this set is my little one’s current favorite! 🙂 I’ll post a picture of her take on this set at the bottom of this post! 🙂


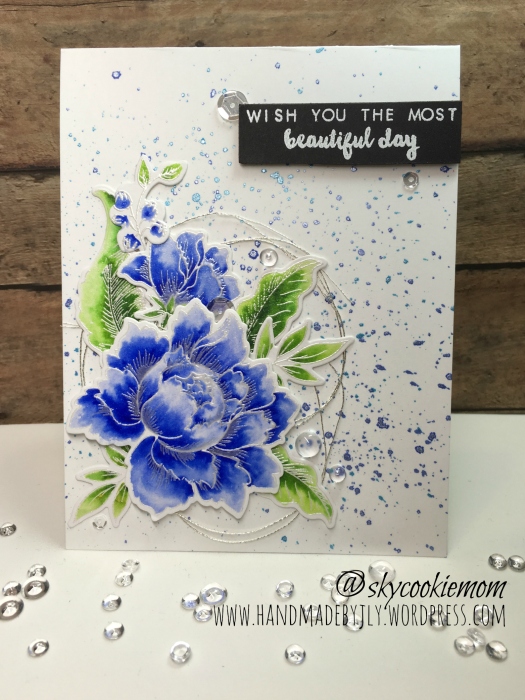
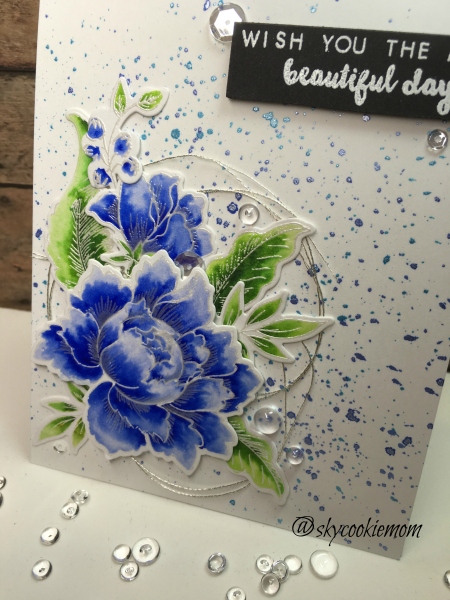
Here is what I made!

SweetCard_April_FE1


All the images are colored with Copic Markers and cut with Scan n Cut2 machine. I kept all the colors bright and cheerful. I drew in some dots with white gel pen to add more interest.

I stamped the sentiment on a black card stock with Versamark ink, heat embossed with Wow “Super Fine White” embossing powder, and fussy cut.

For the background, I die cut a A2 size Canson XL watercolor paper with Lawn Fawn’s “Stripey Backdrop” die. I ink blended Distress inks. The colors I used are: Festive Berries, Mustard Seed, Mowed Lawn, and Peacock Feather”. After ink blending, I sprinkled some water droplets and picked it up with paper towel to add some texture to the panel. I let it dry completely.

On a black cardbase, I adhered yellow glitter paper and the ink blended panel on top. I die cut a black frame with MFT’s “Pierced Stich Rectangle Frame” die and adhered it on the card. I used Scor-Tape for the strong hold.

I adhered all the images on the card with Score-Tape and foam tape, and finished the card by adding some Clear Crystal sequins from Darice.

SweetCard_April_CE1


This wraps up my card for today, but I’d like to show you a card I received from the actual designer of this stamp set! She is one of the designer I truly admire! Do you follow May Park (@mayholicincrafts on Instagram)? I love her stamps and cards, and I was lucky enough to receive couple of beautiful handmade cards from May!

Here is a card she sent me, using the “Way Too Sweet” stamp set! 🙂

May_Way2Swt


Isn’t this card so sweet? 🙂 Well, when my little one saw this card, she grabbed and ran! lol! She does that when she sees a card she really likes. Since she liked it so much, I went ahead and bought the stamp set. When it arrived, it instantly became my daughter’s favorite! ❤

Here are couple of cards my daughter made:

SkylinWay2swt


Thank you so much for visiting!!! Have a blessed week & happy crafting! 🙂

Please subscribe for future blog post notifications! 

Beautiful Blue Peonies

Hello everyone! Hope you are enjoying an amazing weekend! 🙂

I would like to share another card I created using Altenew’s “Peony Garden” stamp set. This time, I only used 2 layers instead of 4, and I colored with Zig Clean Color Real Brush pens and Spectrum Noir Clear Sparkle pen to blend it out. This is one of my favorite water coloring technique.

Here is the card I created:

DarkBluePeony_April_FE1


I stamped all the images (the outline layer only) with Versamark ink on the Bristol cardstock and heat embossed with Wow “Super Fine Silver Pearl” embossing powder. I colored the images with Zig pens and blended the colors with Spectrum Noir Clear Sparkle pen. The Zig colors I used are: “Blue”, “Deep Green”, and “Light Green”. I let it dry completely and stamped the most inner layer (smallest layer) with Versamark on the Peonies only. I heat embossed with the same powder. I die cut the images with the coordinating dies.

The sentiment is from Altenew’s “Beautiful Day.” stamp set. I stamped it with Versamark ink and heat embossed with Wow “Super fine White” embossing powder.

For the background, I ink splashed directly on the card base. I added water and some Perfect Pearls powder to “Peacock Feathers” and ” Blueprint Sketch” and splattered across the whole card base. I let it dry completely, and adhered the silver metallic embroidery thread and the die cut images on top. I used both Scor-Tape and foam tape to adhere all the images and the sentiment.

I finished the card by adding Clear sequins and Clear Droplets from Pretty Pink Posh.


DarkBluePeony_April_CE1


I hope you enjoyed this card and thank you so much for visiting!
Please subscribe for future posting notifications!
Have a blessed day and Happy Crafting!!!

Layer Stamped Blue Peonies

Hello everyone! Hope you are having a great day! 🙂

If you read one of my previous blog post, you might remember I mentioned how I love “Peony Bouquet” stamp set from Altenew. Well, I created 2 more cards using that stamp set last week, and I would like to share one of them today.

Here is what I created:

BluePeony_April_FE1


I layer stamped all the images using Altenew Crisp dye inks. I added bit of Copic markers for more depth, mainly for the shadows and little dots on some of the petals for more textured look. Then I cut all the images with the coordinating dies.

For the background, I used “Stipey Backdrop” die. I die cut 2 panels and I flip one back to create this lattice look. I ink blended “Mustard Seed”, “Peacock Feather”, and “Mowed Lawn” Distress inks. I let it dry completely and attached it behind the lattice.

I adhered the background with Scor-Tape, and I adhered all the images with Multi Medium Matte adhesive and Foam tape. I finished the card with adding some Clear sequins from Pretty Pink Posh. I also added some shimmer on the images with Spectrum Noir Clear Sparkle pen.


BluePeony_April_CE1


BluePeony_April_CE2


I hope you enjoyed this card and thank you so much for visiting!
Please subscribe for future posting notifications!
Have a blessed day and Happy Crafting!!! 

Beautiful Garden

Hello everyone! It seems like I haven’t posted anything for a while now. I did create some cards, but I just didn’t get a chance to post them. I’d like to share one of that card today. I created a garden scene using Altenew’s Garden Grow stamp set. It reminds me of a peaceful relaxing spring garden and I am quite fond of it. 🙂


Let me show you what I created:

Gardencard_April_FE1


All the images are from Altenew’s Garden Grow stamp set, except the sentiment. Oh how I love this set!!! <3<3<3  I cut the images with my beloved Scan n Cut2 machine and colored them with Copic markers. I usually don’t write down the Copic colors I use, I just reference to Sandy Allnock’s Hex Chart and just grab the markers as I go. However, I’m starting to think that I should make a habit of writing them down. The sentiment is from Altenew’s “Beautiful Day.” I stamped it with Versamark ink and heat embossed with Wow “Super fine White” embossing powder.

For the background, I used Lawn Fawn’s “Stripy Backdrop.” If you die cut 2 panels and flip one back, it creates this fun lattice background! I saw a video clip on this on Lawn Fawn IG account, and I fell in love with it! You’ll soon see that this die has become one of my favorite! I also used Lawn Fawn “Stitched Rectangle Frame” to frame the card. I used both “Meadow Border” and “Grassy Border” from Lawn Fawn for the grass. I die cut them and ink blended with “Twisted Citron” and “Mowed Lawn” Distress inks.

I finished the card with adding some Clear sequins from Pretty Pink Posh. I also added some shimmer on the images with Spectrum Noir Clear Sparkle pen.

Gardencard_April_CE1

I hope you enjoyed this card and thank you so much for visiting! 

Please subscribe for future posting notifications!

Have a blessed day and Happy Crafting!!! You are loved!!! <3<3<3