CDD Linky Party!! The theme is… Hearts!!

Hello friends! The theme for this Linky Party at Craftin Desert Divas is “Hearts”! We would love to see all of your projects that fit this theme! So go ahead and craft it and link it up on the Craftin Desert Diva’s Blog.
Every other Monday will mark the beginning of a new semi-weekly Linky Party over
at the CDD blog. We hope you will share your projects with us! And don’t forget
about  the prizes! Every Linky Party will have a winner and a Top 3!
The more times you link up…the more chances you have to win!!
Our Sponsors for this Linky Party are:
One 4″x 6″ stamp set
One Digi Stamp of choice

$25 Gift Card (Regular Priced Items)

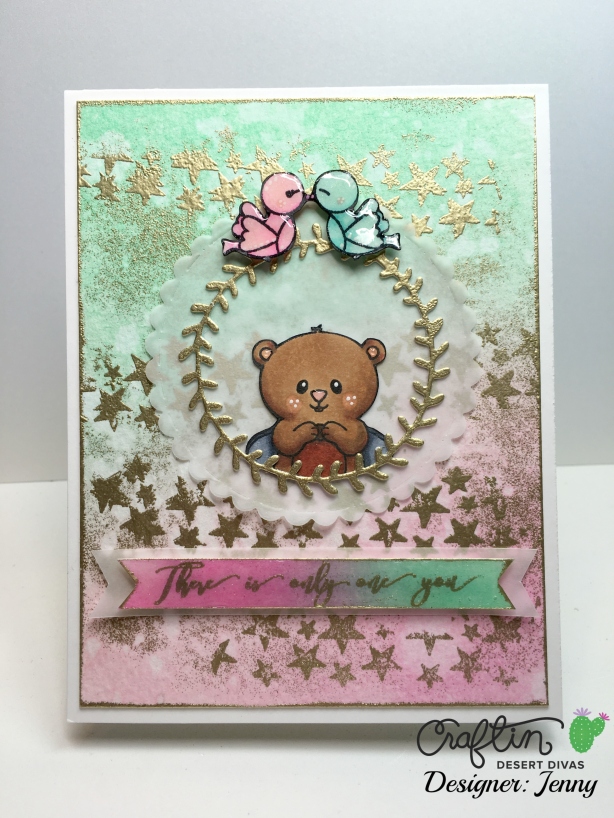
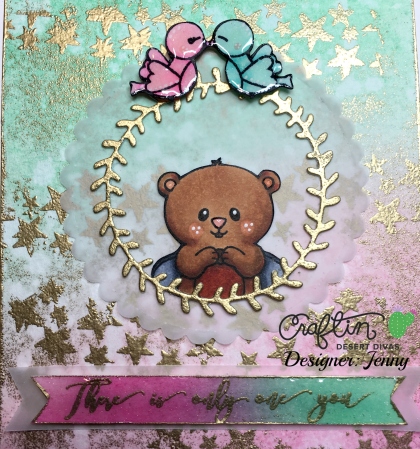
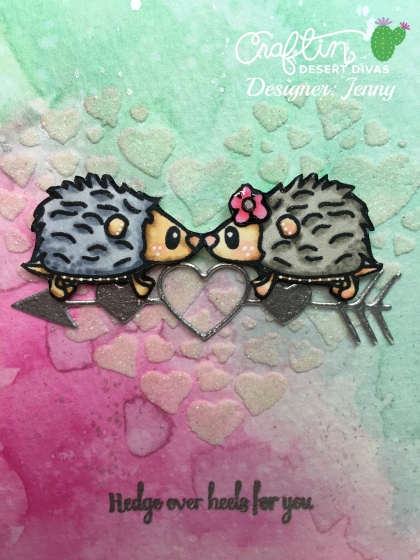
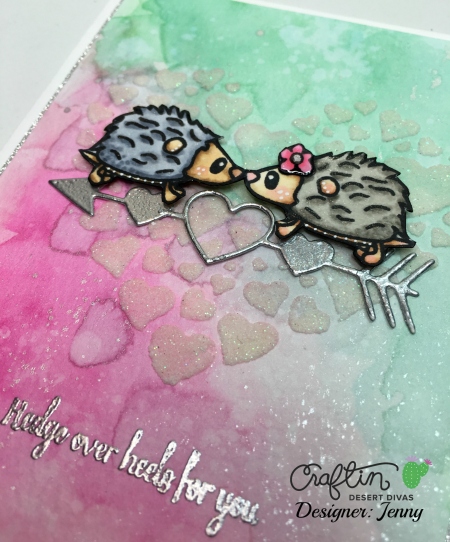
Here is what I made..

I have created a cute shaker card with “Busy Bees” Stamp set and “Heart of Heart” die set. I went with bright orange and yellows to make the card fun and cheerful.

CDD_LinkyHrts_Bee_FE

Here is how I created this card:

1. I stamped the bees and the flowers from the Busy Bee Stamp set on Neenah solar white 80lb. cardstock with Memento Tuxedo Black ink, colored with Copic markers, and fussy cut the images. I added some interest with clear Wink of Stella and white gel pen.
2. I prepared the background panel by ink blending Distress inks (Wild Honey, Carved Pumkin, and Ripe Persimmon) on watercolor paper. With Stripe stencil on top of the background panel, I gently wiped the open areas with baby wipes. I also applied some water droplets to add interest. After I let it dry completely, I die cut it with “Fancy Frames” die, and “Heart of Heart” in the middle.
3. I applied foam tape around the heart and filled it with Green Heart sequins and the little hearts I’ve been saving. Whenever I use the big heart from the “Heart of Heart” die, I save the little hearts aside to use it in the shaker or as embellishments. I added orange, red, and clear acetate hearts in this shaker. I sealed the shaker by adding yellow cardstock on the back.
4. I stamped “I love you” sentiment from the “Simply said” stamp set with Versamark, and heat embossed in white.
5. I adhered the shaker and all the other elements on the card base with Scor-tape. (1/2” & 1/4“)
CDD_LinkyHrts_Bee_C1E
CDD_LinkyHrts_Bee_C2E

Here are all the CDD products I used:

Busy_Bees_final__90975.1448154425.1280.1280 (1)
8ba0b-heart2bof2bheart2bdies
Fancy_Frame_Dies__07267.1439496600.1280.1280
Simply_Said__28150.1439581818.1280.1280
ca39d-12347773_963194863728180_286232579084615740_n
6. Scor-tape 1/4″ & 1/2

Hope you enjoyed this card! Happy crafting and Hope you could join our Linky Party! 


CDD black wm Jenny


CDD January Stamp & Die Release Blog Hop!

Welcome to the CDD January Stamp & Die Release Blog Hop. 
All stamps & Dies are in the CDD Shop and now available for purchase HERE.


Here’s what I’ve created for you…

I created 2 cards with mint & pink in mind!

Gopher card:

CDDJanBlogH_gopher1
1. I stamped the gopher image from the mini set “Poped Up” and the bird couple image from “Lovies” on Neenah 80lb. cardstock. I fussy cut and colored both in Copic markers.
2. Ink blended “Cracked Pistachio,” “Spun Sugar,” and “Picked Raspberry” distress inks on Canson XL watercolor paper trimmed down to 4″x5.25.” Then I scattered water droplets and blotched with paper towel to add interest and let it dry completely.
3. I applied Versamark ink on the star border stamp from the “Across The Border” stamp set and spontaneously stamped it (without attaching to acrylic block) on the ink blended background. I also swiped Versamark around the edge, and heat set the background panel in gold.
4. I die cut 2 frames out of “Stitched Circle” dies – The smaller scallop out of vellum, and the wreath out of Neenah 80lb cardstock. I heat embossed the wreath in gold.
5. I colored a strip of card stock in pink and mint with Copic markers and stamped the sentiment with Versamark ink. I heat embossed the sentiment and around the strip in gold.
6. I assembled everything on the card base, and finished the card by adding glossy accents to the gopher, bird couple, and the sentiment strip.
CDDJanBlogH_gopher2
CDDJanBlogH_gopher3

Hedgehog card:

CDDBlogH_hedge1
1. I stamped the hedgehog couple image from the “Lovies” stamp set on Neenah 80lb. cardstock. I fussy cut and colored the image with Copic Markers.
2. I water colored 3.75″X5″ Strathmore watercolor paper with “Cracked Pistachio,” “Spun Sugar,” and “Picked Raspberry” Distress inks. I scattered some water droplets and picked up with paper towel to add interest. I also splattered shimmer water (Perfect Pearl+water) across the panel and let it dry.
3. I used the negative part of the big heart from “Heart to Heart” die as stencil to apply Snowflake Paste in the middle of the background panel. When it was completely dry, I stamped the sentiment with Versamark ink and heat embossed in silver.
4. I die cut an arrow from the “Heart to Heart” die set and heat embossed in silver.
5. On a white card base, I adhered 4″x5.25″ silver glitter card stock with scor-tape, and background panel with foam tape. I adhered the arrow with Multi Medium Matte adhesive and hedgehog couple with the foam tape.
CDDJanBlogH_Hedge2
CDDJanBlogH_Hedge3


Here are the specials for this release:


**ALL SEQUIN MIXES will be on SALE for $1.00 EACH!!
**FREE SHIPPING on all orders placed, no code necessary!!

Enjoy this special for in stock items only thru 1/31 at 10pm MST

All Stamps and Dies are made in the USA.

CDDJanRelBlogGiveawayPic

**We will be giving away $50 DIVA DOLLARS to one lucky winner to spend in the CDD shop. 
All you have to do is join us for our 2 day hop and leave a comment on each project. The more you comment the more chances you have to win!! Winner will be announced on Monday.
 
Thanks for hopping along with us today! I am your last stop.
We hope you have enjoyed this release and will join us again tomorrow for more projects.


CDD January Release Sneak Peek Day 3

Hello friends! Today is Day 3 of the January release Day 3!

There is Facebook Sneak Peek hop and giveaways for the New Release! Go to https://www.facebook.com/craftindesertdivas to join the fun and hop along!

I have created 2 cards for today, using CDD’s new stamp set called “Lovies” and a mini gopher stamp set called “Popped Up.”


“Lovies” card:

CDD_JanRel_GiraffeFE

  1. For this card, I chose the giraffes out of many adorable animal couples from the set. I stamped the giraffe couple image on Neenah Solar white 80lb. cardstock with Memento Tuxedo Black ink, fussy cut, and colored it with copic markers. I gave it a little more interest by adding some dots with white Gelly Roll pen and glossy accents on the hearts.
  2. For the background, I used the negative part the “Hearts of Hearts” (CDD January release) as stencil. I smooshed Versamark and heat embossed in Gold Tinsel. I also stamped and heat embossed the sentiment “I adore you” the same way, and rounded all 4 corners with the Corner Chomper.
  3. I prepared the 4.25″x5.5″ Neenah 110lb card base by coloring the edges with pink color Copic Maker, swiped the edges with Versamark and heat embossed in Gold Tinsel.
  4. I wrapped the background panel with gold embroidery thread and adhered it on the card base with the foam tape. Then I adhered the giraffes, and the gold heat embossed sentiment “It’s not a stretch to say” in the middle.
  5. I finished the card by adding some “Bubble Gum” Glitter Sprinkles and glossy accents.

CDD_JanRel_GiraffeCUE


“Popped Up” card:

CDD_JanRel_gopherFE

  1. For this card, I stamped the gopher image from CDD new release mini stamp set “Popped Up” on Neenah Solar White 80lb. cardstock, fussy cut, and colored with Copic Markers.
  2. I used CDD’s “Stiched in Circle” Dies and “Banner” Dies to create the frame for the shaker. I colored the scallop frame with Copic Makers and put white dots around with white Gelly Roll pen.
  3. I stamped the sentiment on the acetate window with Staz-on black ink.
  4. I put foam tape around the frame, filled it with “Sweetness” Sequin Mix, and sealed it with the patterned paper. The patterned papers I used on this card are from the 6″x6″ paper pad called “Sweet Things“(available at CDD shop).
  5. I adhered the stripe patterned paper 4.25″x5.5″ on the Neenah 110b. card base. Then I adhered the shaker and the gopher on the card.
  6. I finished the card by adding some “Bubble Gum” and “Cupcake” Glitter Sprinkles. I also tied twine on top of the card.

CDD_JanRel_GopherCUE


I hope you enjoyed my cards today! Stay tuned for CDD’s January Release Blog Hop this Friday and Saturday! (1/22 &1/23/16)

Thank you for visiting and don’t forget to follow~ ^.~*

Have an awesome crafty day!

CDD January release Sneak Peek – day 2

Hello friends!

Today is Day 2 of the Sneak Peek for the January release at CDD, and I am thrilled to present to you my first official CDD design team project!

CDD is hosting a Facebook blog hop for the January release. Please visit https://www.facebook.com/craftindesertdivas and hop along! There will be giveaways!

Win it before you can buy it! Each Sneak Peek day we will give the featured stamp set away. There will be 1 winner for each stamp set showcased!  Be sure and leave a comment and “Like” each facebook fan page at every stop for more chances to win! Winners will be announced the following day. ALL SEQUIN MIXES will be on SALE for $1.00 EACH!!! FREE SHIPPING on all orders placed, no code necessary!!! Enjoy this special for in stock items only thru 1/31 at 10pm MST. All stamps & Dies are made in the USA.


I have created a fun multi-layered water colored card with an adorable mini turtle stamp set called “Slow.”

CDD_JanRel_TurtleFE


  1. The turtle image is stamped on Canson watercolor paper with Versafine Black Onyx ink (watercolor-friendly), heat set with clear embossing powder, and water colored with Peerless Watercolors.
  2. I also stamped the turtle on the vellum repeatedly and heat embossed in white. I used this as one of the background layers.
  3. I stamped the sentiment, “slow down, and get well soon” repeatedly on a watercolor paper with Versafine Black Onyx ink and heat set in clear. Then I die cut with CDD’s new release called “Fancy Stitched Labels, and water colored. I also die cut a small scalloped oval from the same die set to accentuate the turtle image.
  4. Then I water colored an entire panel of 4″x5.25″ water color paper to pull all the layers together.
  5. I adhered all the layers on a 4.25″x5.5″ card base and finished the card by adding some sparkles with “Limeade” Glitter Sparkles and “Sunny Days” sequins.

CDD_JanRel_TurleCUE


I hope you enjoyed my card today! Please come back again tomorrow for more CDD January New Release cards!

Also, please join us this Friday & Saturday for our blog hop that will begin at the Craftin Desert Divas blog:  craftindesertdivasblog.com. We will be giving away $50 DIVA DOLLARS to one lucky winner to spend in the CDD shop. All you have do is join us for our 2 day hop and leave a comment on each project. The more you comment the more chances you have to win!! Winner will be announced on Monday.
We hope you will stop by the Craftin Desert Divas Shop at  http://craftindesertdivas.com. We would love for you to join us in the Craftin Desert Divas Gallery Facebook group https://www.facebook.com/groups/1428163220758119/ and share your creations using Craftin Desert Divas’ stamps.

Have an awesome crafty day and don’t forget to follow my blog~! ^.~*


1 image, 3 different coloring mediums

Hello friends!

Sorry I’ve been quiet. My kiddo was sick and stayed home with me for many days, so I couldn’t get much done. I was also occupied with design team projects as well. My daughter was able to go back to school few days ago, so I’m trying to catch-up on both personal and DT projects. By the way, CDD will be having Sneak Peek hop from Jan 18 ~ Jan 23! Some of my first DT projects will be showcased during this event, so I’m hoping you guys could join the fun and hop along! There will be giveaways during the hop! 🙂 CDD January release is packed with cuteness! I cannot wait for you guys to see and get your hands on them! You can see all the CDD January Sneak Peek Hop info here. I created my fan page https://www.facebook.com/HandmadebyJLY/ , and you will be able to see my CDD projects there once the hop goes live! Hope you see you guys there! 🙂


Now, here are the 3 cards I created!

I created these cards to send out to my friends for different occasions. The card design is very simple. One colored image, a sentiment, and some embellishments. However, I did put effort in coloring the images for each card with different coloring mediums.

I used the watering can stamp from “Home Sweet Home” set from CDD, and the sentiments are from “Say It Big” stamp set.

CDD_HOMESaybigstamp

I colored the watering can image in 3 different coloring mediums: Peerless Watercolors, Copic markers, and Prismacolor colored pencils.

  1. Peerless Watercolors are pigmented sheets of paper. You can pick up the colors right off the sheets with water brushes or regular watercolor brushes, and transfer the pigments to the palette to blend, or apply directly to your projects. For this card, I stamped the water can image on Canson XL watercolor paper with Tim Holtz distress ink in “Antique Linen” for no-line coloring. Distress ink reactivates with water and this color blends in with the rest of the colors, so it’s perfect ink for this purpose. Then I colored the image with various colors from Peerless Watercolors palette. I applied many layers of lighter shades instead of applying concentrated pigments. This helps to achieve better blending and depth. Then I stamped the greeting “Hello” with Versafine Black Onyx ink (watercolor friendly), and heat set with clear embossing powder. I cut down the watercolor paper to 4″x5.25″, rounded the corners .5″ with the corner chomper, and adhered it on the 4.25″x5.5″ black card base with the .5″ score tape. I finished the card with some Pretty Pink Posh clear sequins. IMG_1094
  2. Copic markers are alcohol based markers. They are pricey, but it’s a good investment in my opinion. For this card, I stamped the image on Neenah solar white 80 lb. cardstock with Memento Black Tuxedo ink (copic friendly). I colored it with copics, blending various colors. Then I stamped “Thank you,” with Versafine Black Onyx ink and heat set with clear embossing powder. I trimmed the paper down to 4″x5.25″ and adhered on black card base, and adhered some clear droplets. IMG_1095
  3. Prismacolor colored pencils are high quality pencils. It blends well and easy to use. I stamped the image on same paper and ink pad I used on the copic marker card above. I stamped “Happy Birthday” and heat set just like the other 2 cards. For this card, I rounded the corners .5″ both card stock (4″x5.5″) and the card base (4.25×5.5″), and embellished with the hemp cord. I also added some clear droplets. IMG_1093


Colors I used:

  • Peerless Watercolors: Royal Crimson, Blood Red, Pearl Gray, Natural Tint, Warm Sepia, Brilliant Yellow, Orange Yellow, Hunter’s Green, Olive Green.
  • Copic markers: C1, C3, C5, W1, W3, W5, R27, R29, R39, Y15, Y17, YR04, G07, G19, YG13
  • Prismacolor colored pencils: 1058, 1054, 1060, 915, 1002, 942, 913, 1005, 908, 923, 924, 1052, 1056


Hope you enjoyed these cards! Thank you for visiting and have a wonderful crafty day!

Please don’t forget to follow! ^.~*


Friendship is a million little things!

Hello friends! Hope you are having a fabulous Friday! TGIF!!!

Blog010816_IMG_1019

Today, I’d like to share this colorful watercolor card with you. The bird stamp is called “A New Day” from WPlus9, and it’s perfect if you like to water color just like I do! 🙂 Dawn at WPlus9 is a genius in water coloring, so I guess it’s not a surprise that her stamps are great for that.


Here is step by step how I created this card:

  1. First, I stamped the image with Versafine Black Onyx Ink on the Canson XL water color paper and heat set it with Wow! Ultrafine Clear embossing powder. This embossing powder is my favorite clear embossing powder to heat set images with fine details.
  2. I colored the image with Peerless Watercolors and the Pentel waterbrush. The blue highlight around the image was colored with Tim Holtz distress inks. The colors I used are all listed at the end of this post.
  3. Then I stamped the sentiment. I picked up this fabulous woodblock stamp last weekend from Hobby Lobby (manufacturer is Hampton Art). It was supposed to be 40% off, but the discount wasn’t applied at the register. Don’t you hate it when that happens? Ugh! But I love this stamp regardless! I did also stamp the sentiment and heat set it with the same products I used for the bird image.
  4. I felt like the card needed a “frame”, so I drew the lines around the image with the micron pens with .5 tip. This is something I learned during the 30day coloring challenge hosted by Kathy Racoosin. Are you guys ready for the new February coloring challenge? Well, I am!
  5. I adhered the water color front panel on the black card base with the 3M foam tape, and finished the card by adhering some droplets from Pretty Pink Posh with multi medium matte adhesive.

Thank you for visiting HandmadebyJLY!

Have a fabulous weekend, everyone!

Please do not hesitate to ask me any other questions should you have!

You can do so by leaving comment below, or you can reach me at Instagram. My Instagram id is @skycookiemom .


Peerless watercolors I used:

for the bird: Japonica Scarlet, Blood Red, Brilliant Yellow, Cobalt Blue, Turquoise Blue, Pearl Gray, and Warm Sepia

for the tree: Mahogany Brown, Sepia Brown, Olive Green, Chrome Green, and Alizarine Red

Distress inks for the blue outline: Tumbled Glass and Salty Ocean.


My New Year Resolution

This year, I came up with 2 things I want to accomplish this year.


1.To create a blog for my passion for paper crafting. – Check!

Believe it or not, it took me some courage to accomplish this. As I am creating the very first blog post here, I am a nervous wreck & feeling very lost. Hopefully I learn the necessary skills along the way to make this blog richer and more beautiful!


2. To “HEAL”

I went through a back surgery in February of 2015, and I am still on my road to my 100% recovery. Last year was one of the darkest days of my life, but I did found something very valuable and precious to me: paper crafting. As I was restricted from most daily activities, I spent a lot of time on bed watching numerous card making tutorials on YouTube. I was in lots of pain and my spirit started suffering as well. However, I started this wonderful card art during that time and it was a tremendous healing for my low spirit. Stamping, coloring, and just creating something with your own hands is such an awesome therapy for the soul!

Well, I’m going to continue the healing! I’m going to do more healing this year by creating more beautiful cards!

I’m also planning to take on more healthy diet and exercise more for my physical health as well as mental.


Please cheer me on as I accomplish these goals in 2016!

Thank you for visiting my blog, HandmadebyJLY.worpress.com !