The Ton’s October 2017 Release Blog Hop

Ton_October2017Release_Badge


Hello and welcome to The Ton’s Fall 2017 Release Blog Hop! It’s Jenny here, and if you just came from Tae Eun‘s page, you are at the right place!

We have 10 new stamp sets, 10 Coordinating dies, and a rubber cling stamp for our new October 2017 Release!


For our hop, we have a shipping discount for domestic orders. Our shipping promo ends on November 1 at 11:59pm. This promotion does not apply to prior purchases. The threshold amount is calculated before taxes and shipping. For U.S. orders, receive free shipping on orders over $75. Use code “USOCT17” at checkout.


October 2017 Release Products


How beautiful are our new October Release products?!! Oh, I am in love!!! Hope you are enjoying our new products and inspirations from our team. Stamp sets for this release are designed by Effie and our very own, fabulously talented Eunji Jung! Let me tell ya, it was extremely difficult to choose the sets I want to make today’s projects with. After contemplating many days, I decided to go with Tulip Bouquet, Daffodil Greetings, Celebration Rose Cluster, and Country Rose Cluster stamp set. I had so much fun creating these 4 cards and I cannot wait to share them with you! So let’s get started!

Here’s the first card I made with our new Tulip Bouquet stamp set!

Ton_Oct2017Release_tulip_FE1.jpg

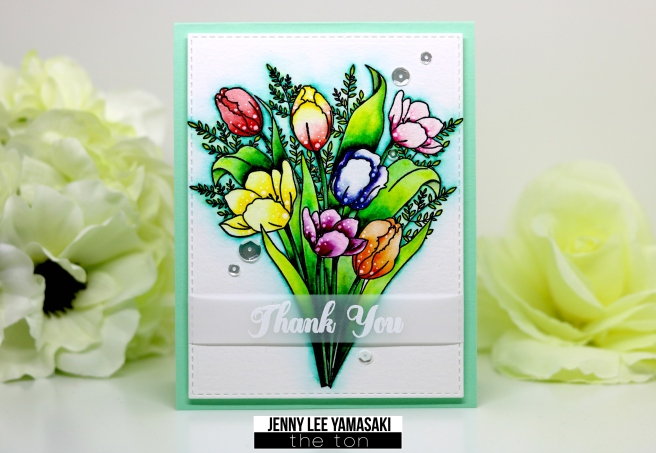
I started off by stamping the Tulip Bouquet image on a watercolor cardstock in our Noir ink and heat embossed with clear powder. I stamped the image multiple times so the ink could stay moist long enough for the embossing powder to stick. Then I started coloring with various Stabilo 68 pens, blending the color with Clear Sparkle Pen instead of clear water. However, I used Turquoise Green Zig marker and clean clear water for the background. I also added some white gel pen dots for added interest.

Ton_Oct2017Release_tulip_CE1

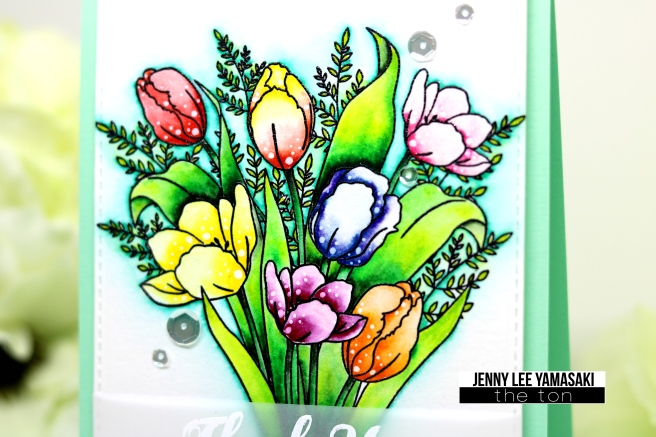
When the coloring was done, I waited for the panel to dry completely and die cut using the largest die from our Small Double Stitched Rectangle Dies. Next, I stamped the sentiment on vellum strip, heat embossed in white, and wrapped it around the panel. I popped up the panel on a mint A2 sized top folding card base using fun foam and finished the card off by adding some Glass Slippers Sequins.


Here’s the 2nd card I created with our new Daffodil Greetings stamp set. This set will be available for purchase next month.

Ton_Oct2017Release_Daffodil_FE1


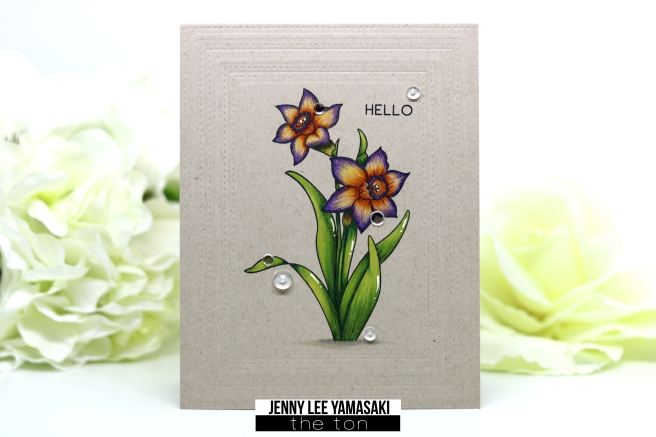
For the color scheme, I was totally inspired by this image I found on Google!

Purple Daffodil

To start off, I stamped the Daffodil Greetings image on a kraft cardstock in our Copic friendly Caviar Hybrid ink. I first colored the image with Copic Markers. The colors I used are V17, V15, V09, V01, YR07, YR09, Y17, YG67, YG17, YG03, and YG01. Then, I added more details with matching Polychromos color pencils. I also added some gel pen highlights.

Ton_Oct2017Release_Daffodil_CE1

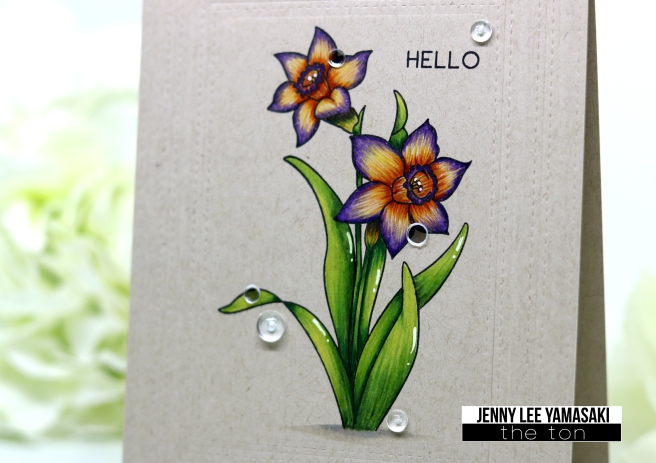
Next, I dry embossed the frame around the panel using 3 largest dies from our Large Double Stitched Rectangle Dies and the rubber embossing pad. I stamped the sentiment (from the Country Rose stamp set) on the panel and finished the card off by adding some Dew Drops and Glass Slippers Confetti.


Here’s 3rd card I made using our new Celebration Rose Cluster Stamp set!

Ton_Oct2017Release_CelebrationRose_FE1

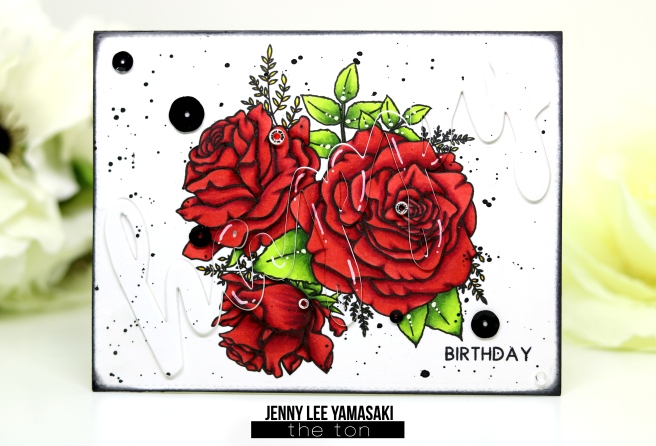
I started off by stamping the Celebration Rose Cluster image on a smooth white cardstock in our Caviar Hybrid ink. I colored the image with Copic markers and retraced all the lines with a black felt tip pen to achieve bold dark lines. The Copic colors I used are R89, R29, R24, Y17, Y06, YG67, YG17, YG03, and YG01. I also splattered black opaque watercolor on the panel for added interest. I die cut the panel down using the largest layer from the Large Double Stitched Rectangle Dies.

Ton_Oct2017Release_CelebrationRose_CE1

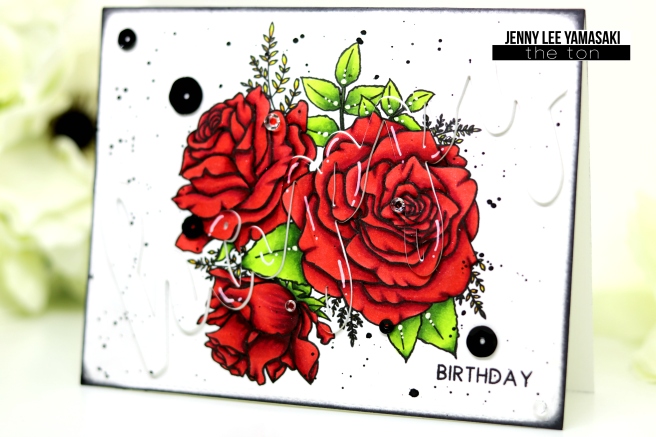
Then, I die cut using our Brushed Happy Coordinating die over the image. I die cut 2 more out of white cardstock and glued all of them together for added dimension. I pieced it together and adhered it on a white A2 card base. I stamped the sentiment (from Country Rose Cluster Stamp set) and blended Light Onyx Dye and Noir Dye ink on the edges. I dressed up with some Clear Rhinestones and sequins from Black Tie Affair Mix and the card was complete!


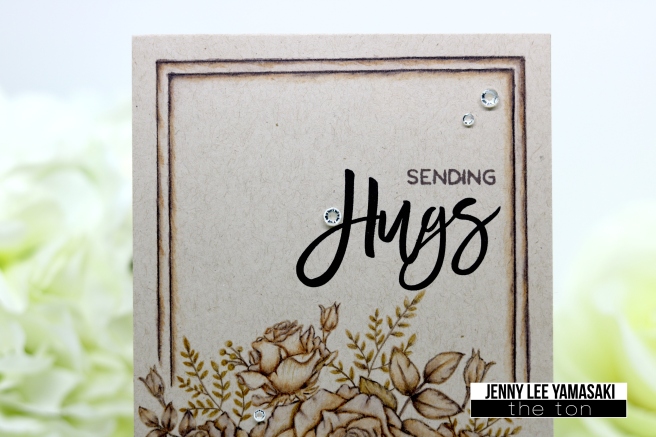
Last but not least, here’s the 4th card using our new Country Rose Cluster stamp set.

Ton_Oct2017Release_CountryRose_FE1

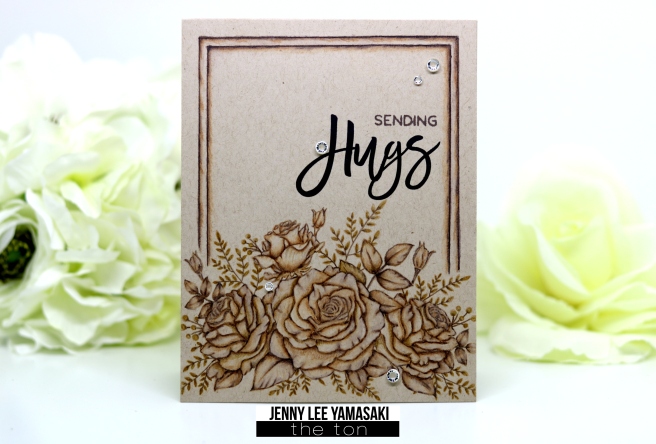
I started the card by stamping the Country Rose Cluster image on a kraft cardstock in our Found Topaz Dye ink. Then I colored the image with couple of Inktense pencils (Willow & Bark) and Polychromos pencils (Raw Umber & Walnut Brown) keeping the monochromatic no-line coloring look. I drew and colored the frame on the panel using the same pencils. This card was inspired by Marika Rahtu’s stunning monochromatic card I saw on YouTube. 🙂

Ton_Oct2017Release_CountryRose_CE1

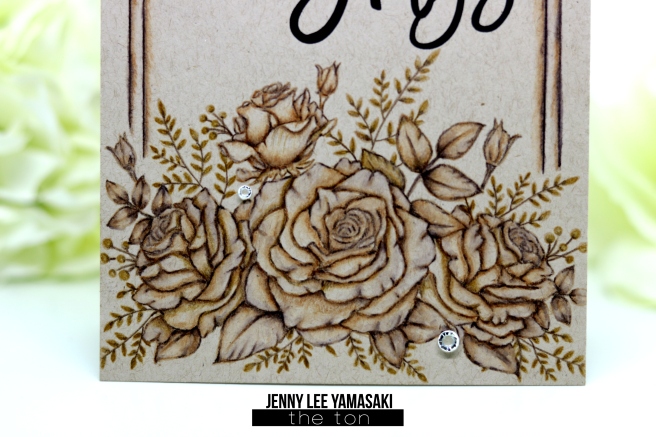
I stamped the sentiment “sending” in Dark Roast Dye ink and “Hugs” in Noir Dye ink and adhered the panel on a A2 kraft card base. I dressed up the card with some Clear Rhinestones and it was done!

Ton_Oct2017Release_CountryRose_CE2


BLOG HOP GIVEAWAYS
We’re giving away one stamp of choice from our October Release to a commenter! To qualify, you must leave a comment on each blog on the hop. The comment period will close on Sunday, October 29 at 7pm EST. The winner will be announced on The Ton blog thereafter.


The Order of the Hop is as follows:

The Ton
Olga
Anna
Lisa
Janette
Brenda
Tae Eun
Jenny <———————— You are here! 🙂
Laura Jane <—————- Your next stop!
Vera
Eunji
Mayline


THE TON CHALLENGE

Be sure to check out our challenge blog for this month! We have a fun Caffeine Mood Board. Pretty pictures of floral arrangement and a cup of coffee along with some fun and clean elements are filling the mood board. Head on over to The Ton Challenge blog  for more details and inspiration! As always one winner will get $50 gift certificate to The Ton Shop and get the chance to be a guest designer at The Ton Challenge blog!

*Gift certificates only apply to The Ton stamps, dies, ink, gilding and embossing powder.*

b14b0-mood2bboard2b2

Ton_OctoberChallenge_Moodboard


Hope you enjoyed the cards, and thank you so much for stopping by! Your next stop is fabulous Laura Jane‘s Blog!

Hope you have a wonderful day! Happy crafting!

hugs,

Ton_signature

Thankful Chrysanthemum

Hello everyone! Hope you’re having a fabulous day! 🙂

For today, I would like to share a project I created using one of The Ton’s October Release products, Thankful Chrysanthemum (designed by my design teammate Eunji). If you follow my Instagram account, you may have seen the pink Chrysanthemum card I created with Eunji’s digital stamp. For this time, I went with a non-traditional palette for a different look!

Here’s the card!

Ton_OctoberChrysanthemum_FE1

To start off, I stamped the Chrysanthemum image on a watercolor cardstock in Versamark ink. I sprinkled Copper embossing powder and heat set with the heat tool. Then I watercolored the flower with a mixture of Turquoise Color Burst Powder and Gansai Tambi Watercolors in Red Gold from Starry Colors palette. I dropped Turquoise toward the center of the petals and Red Gold from the tip and had them meet on the middle to create this look. For the stem and the leaves, I used brown watercolors from Gansai Tambi. When the panel was completely dry, I die cut it down with the largest layer from the Large Double Stitched Rectangle Dies and trimmed the edges tiny bit using the Tim Holtz Trimmer.

Ton_OctoberChrysanthemum_CE1

Next, I ink blended and darkened up the edges of the panel using Warm Hazelnut, Found Topaz, Aspen Cocoa, and Dark Roast Dye ink. I stamped the sentiment (borrowed from The Ton’s Book Life stamp set) in Noir Dye ink. I loosely masked up the sentiment and the flower with scratch papers and splattered gold and black watercolors and let it dry. I adhered the panel on a black A2 top folding card base and dressed up the card with Matte Gold and Night Sequins from The Ton to complete the card!

That’s all from me today and I hope you enjoyed the card. Hope you’d visit The Ton Stamps to check out the gorgeous new October Release floral stamp sets.

Thank you for stopping by and hope you have a wonderful day! Happy crafting!

hugs,

Ton_signature

Dot.B October Release Day 3 – Thanks Giving

Hello everyone! It’s Jenny here and I’m back with another project for Eunji’s  DotBstamp on Etsy. For today, I’m show casing adorable animal digital stamp called Thanks Giving. This digital stamp set consists of 2 animals dressed up as pilgrims and there are also many small images which makes it perfect to create fall/Thanksgiving themed scene cards. Let me show you the stamp images!

Eunjoa_ThanksGiving_WM


Let me show you what I made with those adorable images!

Eunjoa_Thanksgiving_FE1

To start off, I printed 2 sets of the Thanks Giving digital stamp set on Bristol Smooth cardstocks. I cut the cardstocks down to A4 size to fit my printer. I colored 2 sets of pumpkins and 1 set of rest of the images with Zig Clean Color Real Brush Markers. Colors I used are: Scarlet Red, Bright Yellow, Deep Green Olive Green, Light Green, Geranium Red, Red, Flesh Color, Light Pink, Oatmeal, Light Gray, Dark Brown, Mid Brown, Brown, and Beige. I blended the pigments with fine tip water brushes. I let all the images dry completely and I cut them all out with my ScanNcut2 machine.

Eunjoa_Thanksgiving_CE1

Next, I moved on to the background. Using the MFT’s Cloud Stencil, I ink blended Mustard Seed, Picked Raspberry, and Carved Pumpkin Distress Inks to create the fall color cloud background. I also stamped the sentiment (borrowed from Neat&Tangled Maple Thanks stamp set) in The Ton’s Noir Dye Ink. Then I die cut few grass borders using Lawn Fawn’s Meadow Border and Grassy Border dies. I kept the grass borders white, because the card was already getting bit busy. Then, I adhered the background panel on a top folding white A2 card base and popped up the grass borders with foam tape. I adhered the colored images onto the card and added some white gel pen here and there. I dressed up the card with some Darice Iridescent sequins of mixed sizes and this card was done!

That’s all from me today and I hope you enjoyed the card. Don’t forget to visit Eunji’s DotBstamp Etsy shop. There are lots of adorable animal images and beautiful floral sets too!

Thank you for stopping by! Happy crafting!

hugs,

Ton_signature


Pretty Plumeria

Hello, everyone! I’m over at The Ton’s Blog today showcasing on of our new October 2017 Release! Out of all those gorgeous new sets, I chose Pretty Plumeria stamp set. Hope you’d stop by and check out the details!


Ton_PrettyPlumeria_FE2


Also…

Be sure to check out our challenge blog for this month! We have a fun Caffeine Mood Board. Pretty pictures of floral arrangement and a cup of coffee along with some fun and clean elements are filling the mood board. Head on over to The Ton Challenge blog  for more details and inspiration! As always one winner will get $50 gift certificate to The Ton Shop and get the chance to be a guest designer at The Ton Challenge blog!

*Gift certificates only apply to The Ton stamps, dies, ink, gilding and embossing powder.*

b14b0-mood2bboard2b2

Ton_OctoberChallenge_Moodboard


Thank you for stopping by! Happy Crafting!

hugs,

Ton_signature

Dot.B October Release Day 2

Hello, everyone! I’m guesting again for Dot.B Stamp on Etsy Eunji. For today, I have a floral card I created with a brand new floral Digital Stamp called Juliet Rose. It’s a beautiful rose image with lots of fun petals and leaves to color in!

Eunji_JulietRose_WM


Here is the card!

EunJoa_JulietRose_FE1

To start off, I printed the Juliet Rose Digital Stamp on a Neenah Solar White 80lb. cardstock. Then, I colored the image in with Copic Markers. The Colors I used are: RV21, V000, Y15, Y06, YG67, YG17, YG03, YG01, C1, C00, BG13, BG11, B0000, 0. I added some dots with the BG markers and white dots with Gel Pen to add more interest. When the coloring was complete, I die cut the panel with the largest die from The Ton’s Small Double Stitched Rectangle Dies. I also cut a pink background panel slightly smaller than the card base and adhered both panels on a black A2 card base.

I stamped the sentiment from The Ton’s Sunnies stamp set on a black cardstock in Versamark ink and heat embossed in white. I cut it out into a small banner and popped it up on the card using the foam tape. To finish the card, I added natural color twine and some iridescent sequins from Darice.

Eunjoa_JulietRose_CE1

That’s all from me today! Don’t forget to visit  Eunji’s Etsy shop, DotBstamp to check out Juliet Rose Digital stamp and many other beautiful and adorable images! Thank you for stopping by! Happy Crafting!

hugs,

Ton_signature

Happy World Card Making Day! – Poinsettia Close Up

Hello, everyone! Happy World Card Making Day!!! It was a busy day with family, but I was able to sneak in a little crafty time to create something. I stamped and colored The Ton’s Poinsettia Close up Background Cling stamp for today’s project. I didn’t get to play with this beautiful image during the Fall 2017 Release week, and I’m so glad that I finally got to play with it. This image has huge petals and leaves, which make it so fun to color!

Here’s the card!

Ton_PoinsettiaCloseup_FE1.jpg

To start off, I stamped the Poinsettia Close Up Background Cling stamp on watercolor cardstock in Versamark using the MISTI stamping tool. I always use MISTI tool when stamping on watercolor paper with lots of texture. Then I sprinkled Rose Gold Embossing Powder and heat set till it was nice and smooth.

Next, I colored the image with Peony, Marigold, Lemon Yellow, Sap Green, and Lime Green Color Burst powders. I didn’t go with traditional red colors, and I quite like how it turned out. When the panel was completely dry, I cut it down to 5.5″ square and rounded the corners with the Corner Chomper and added bit of interest by ink blending Peach Blossom Dye ink around the edges.

Ton_PoinsettiaCloseUp_CE1

I also stamped the sentiment (from Holiday Love Poinsettia stamp set) on vellum in Versamark and heat embossed with the Rose Gold Embossing Powder. I cut it down to a banner, wrapped it around and taped it down on the back of the panel. I decorated the edges of a 6″ square white top folding cardbase with Burnished Rose Gold Foil tape and popped up the main panel on top using foam tape. I dressed up the card with some Glass Slippers sequins and Sugar Cookie Couture Mix and the card was done!

That’s all from me today! Hope I was able to inspire you to go create something beautiful for the World Card Making Day! Thank you for stopping by!


hugs,

Ton_signature


Dot.B October Animal Stamp Release Day1

Hello everyone! Jenny here! For today’s project, I created a fun holiday card showcasing Eunji’s adorable new digital stamp called Holiday Party. You can find this stamp at her Etsy shop, DotBstamp! There are 5 adorable animal images dressed up perfectly for holidays, and I used 3 images with deer antler costumes from this set.

Eunji_HolidayParty_WM

Here’s the card!

Eunjoa_HolidayParty_FE1.jpg


I started the card by downloading and printing the images (Holiday Party) on Bristol Smooth cardstock. I watercolored the images with Stabilo68 pens, blending the pigments with clean clear water and the Aquabrush. The colors I used are: 88, 89, 45, 75, 96, 29, 50, 19, 44, 33, and 36. When the images were completely dry, I cut them out with my ScanNcut2 machine and put them aside.

Eunjoa_HolidayParty_CE2

Next, I moved on to the background panel. I wanted to create a snow scene, so first I ink blended Faded Jeans and Salty Ocean Oxide Distress inks on a Bristol Smooth cardstock with ink blender tool. Then, I splattered bit of water and blotted with paper towel to lift some pigments and add more interest. I also splattered some white opaque watercolor and this really completed the snow scene look. I waited for the panel to dry and die cut using the largest die from The Ton’s Large Double Stitched Rectangle Dies. I adhered the panel on to a white A2 card base.

I die cut “JOY” using SSS’s Big Joy Dies out of silver glitter cardstock and popped them up on the card with foam tape. I also popped up the animal images on the card and drew in some dots and lines with white and silver glitter gel pens to add more interest. I adhered some Silver star and Iridescent clear sequins and added some Silver Moondust Nuvo Drops to complete the card!

Eunjoa_HolidayParty_CE1

Hope you enjoyed today’s project! I had so much fun creating this card with adorable images. Have an amazing day and don’t forget to stop by at DotBstamp on Etsy to check out beautiful and cute digital stamps! Thank you for stopping by!

hugs,

Ton_signature


The Ton’s October 2017 Challenge – Caffeine Mood Board

Ton_Moodboard_Badge

Ton_OctoberChallenge_Moodboard


Hello, everyone! Hope you are all having a wonderful day! Today is the first day of October, and the new The Ton’s Challenge is now live! We are playing beautiful coffee themed mood board this month!

Hope you’d join for a chance to win a $50 spree to The Ton’s shop!

*Gift certificates only apply to The Ton Stamps, Dies, Ink, Gilding, and Embossing Powder.

Here is how to play:

To participate in our challenge, create a paper crafting project based on the monthly theme.

  1. You must use a Ton product as the main focal point of your card or tag.
  2. Display the cue word/inspiration photo on your blog post and include a link to this challenge in the body of your post.
  3. There is no limit to the number of projects you wish to enter into the challenge.
  4. The winning project will be chosen based upon detail, composition and aesthetics.
  5. Enter your card by October 31, 2017 by 12:55pm EST.
  6.  There is a $50 Gift card that will go to the winning entry!

Please visit The Ton’s CHALLENGE BLOG for more info.


For this month’s Challenge, I created 2 cards focusing on pink, purple, peonies, and of course coffee!

Here’s the first card!

Ton_PeonyCoffee_CE1

I started the card by stamping the Floral Border Cling Background stamp on kraft cardstock in Versamark. I sprinkled our gorgeous Rose Gold Embossing powder and heat set that with heat tool. Then I also stamped the coffee cup image from our Tea Party stamp set also in Versamark and heat embossed with white powder.

Ton_PeonyCoffee_CE2

Then I ink blended Hollywood Star Dye, Pink Derby Dye, and Iris Bloom Dye ink all around the peony images. I colored the cup image with Prismacolor color pencils. I covered up the cup image and splattered opaque white paint to add more interest. I let it dry completely.

Next, I stamped the Floral Banner Mini stamp on smooth white cardstock in Versamark and heat embossed with Rose Gold Embossing powder. I stamped the sentiment inPink Derby Dye ink and die cut the image using the coordinating die.

Ton_PeonyCoffee_FE1

I trimmed the panel slightly smaller than the A2 size and adhered it on to a A2 kraft card base. Then I adhered the Floral Banner die cut and finished the card by adding some Glass Slippers sequins.


Here’s the 2nd card!

Ton_kittyCoffee_FE1

For this card, I tried to keep it cute and witty! I started the card by stamping the cup image from Tea Party stamp set and the sentiment from our Caffeine Crush Sentiment stamp set on a smooth white cardstock in our Copic-Friendly Caviar Hybrid ink. I masked off the cup image and stamped the kitty from our Love and a Cat stamp set, also in Caviar Hybrid ink. Off to the side, I also stamped the Peony Cluster Mini stamp on a smooth white cardstock in Caviar Hybrid ink and die cut using the coordinating die.

Ton_kittycoffee_CE1

Then I colored all the images with various Copic markers, and added white gel pen dots and highlights to the images here and there. I also added some shimmer using the clear Sparkle Pen. Next, I ink blended the edges with Hollywood Star Dye ink and die cut the panel using the largest die from our Large Double Stitched Rectangle Dies. I adhered the penel on a white A2 sized card base and adhered the Peony Cluster on the bottom of the cup using foam tape. I dressed up the card by adhering some Clear Rhinestones and sequins from our Violet Sprinkle Couture Mix.

Ton_kittyCoffee_CE2


Hope you enjoyed today’s projects! I also hope that I was able to inspire you to go create and join our challenge this month! Thank you for stopping by! Happy Crafting!


hugs,

Ton_signature